
Avoid Achilles injuries by strengthening these running muscles

Achilles injury prevention for runners includes strengthening your muscles as high up as around your bum and hips. Learn which main muscles we use for running, how you can test whether each of them is strong enough to avoid an Achilles overuse injury, and how to strengthen those that need attention.
Remember, if you need help with an Achilles injury, you're welcome to consult one of our physio team via video call.

The terms tendinitis, tendonitis, tendinosis, and tendinopathy mean the same thing for all practical purposes, and we use these interchangeably in most of our articles.
In this article:
💡 Before we start: The advice in this article is for runners who are not injured. If you do have an injury, please get it sorted before you do these tests.
Here's the full video Alison made on this topic:
Which muscles to strengthen and why
Strength training can reduce the risk of all types of sports injuries by 60% to 70%. If we look at overuse injuries – so, injuries that happened over a period of time, like an Achilles tendonitis or tendinopathy, as opposed to in a single incident – it can decrease your risk of injury by 50%.

The main muscles we use for running that affect the Achilles tendon and how much load it has to absorb are:
the quadriceps (quads) on the front of the thigh
the hamstrings at the back
the gluteals (glute max, med, and min) – your bum muscles
the calf muscles (gastrocnemius and soleus) – these muscles attach into the Achilles tendon
We also use other muscles, like our hip flexors (front of the hips) and core muscles; as well as various muscles on our upper body as we swing our arms when we run.
How is your running alignment?
Before we get into testing individual muscle groups, let’s take a look at how well your muscles support your running alignment in general.
If they are doing a good job, your hips, knees, and toes will align vertically (with some minor deviation) when you run.
If they are not strong enough to keep you well-aligned, it might have a knock-on effect on various parts of your body, including the Achilles tendon.
Instructions (this movement mimics the alignment when you walk or run)
Stand on one leg, facing a full-length mirror or video yourself from the front.
Slowly bend that leg about 30 degrees to perform a mini squat, trying to keep your hip, knee, and foot vertically aligned.
Then come back upright.
Repeat on the other side and compare your results.
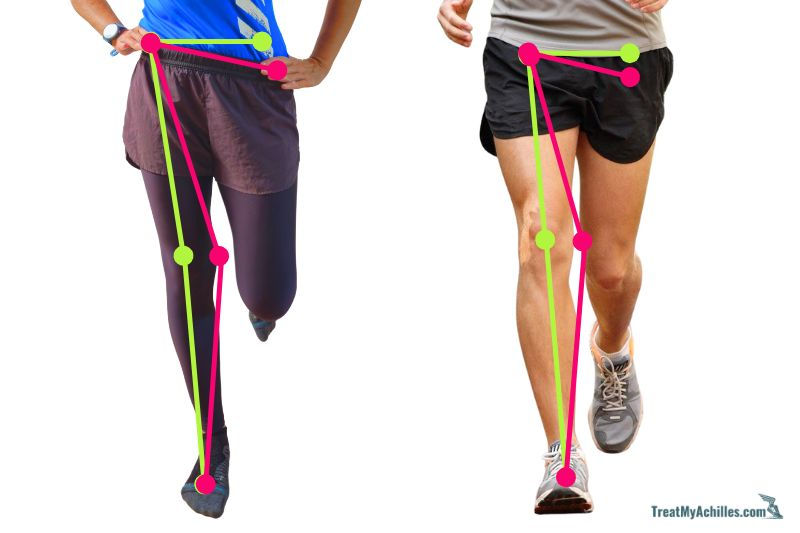
Interpreting your results:
If your pelvis drops excessively as you lower and lift, then the gluteal muscles (glute med specifically) on your supporting leg likely need strengthening.
If your knee turns in excessively but your foot and ankle remain relatively stable, it might be due to reduced strength in the muscles that control the outward turning of your hip (the gluteals again).
But if you notice your foot or ankle also rolling in excessively, then you likely also have to strengthen the lower-leg muscles that control that movement – focusing on keeping your ankle stable during balance or single-leg supported exercises will also help strengthen it.
Now, let’s look at three simple tests you can do at home to check whether your muscles are strong enough to avoid overuse injuries of your Achilles tendons. And if you do find weakness somewhere, these same tests can then be used as strength exercises.


1. Bridge test
Main muscles involved
Hamstrings and glutes

Video demo
Instructions - Single-leg glute bridge
Lie with your knees bent to 90 degrees and feet flat on the floor.
Lift one leg towards you so that the thigh is tucked against your stomach.
Tighten your stomach muscles and squeeze your glutes to lift your hips up in about 2 seconds.
Keep your hips level, correcting your position if necessary.
Come back down, again using about 2 seconds for the movement.
Do as many of these as you can with good form, and then repeat with the other leg.
Top tip: If your hamstrings cramp, stretch them for a bit and then go again. It can also help to move your feet closer to your bum.
Results interpretation (per leg)
Fewer than 10: Needs work – use the test as an exercise to strengthen up those glutes and hamstrings
More than 15: Fair
More than 20: Good ✅
2. Side leg lift test
Muscles involved
Glute med

Video demo
Instructions
Lie on your side, legs straight, with your heels, bum, and bottom shoulder blade against a wall.
Keeping your top leg straight and maintaining heel contact with the wall, lift it up as high as it will go.
Come back down.
Do as many as you can, again using about 2 seconds for each up movement and again 2 seconds for each down movement.
Repeat with the other leg.
Results interpretation (per leg)
Fewer than 15: Needs work – use the test as an exercise to strengthen your glute med muscles
More than 20: Fair
More than 25: Good ✅
3. Sit-to-stand test
Muscles involved
Mainly the quads, but the glutes and hamstrings also contribute.

Video demo
Instructions
Find something stable to sit on with your knees bent 90 degrees and your feet flat on the floor.
Stand up, using only one leg.
If you find this too hard or have very poor form, make the surface higher (use a higher chair or use pillows/cushions).
Lower yourself back down with control (as opposed to allowing gravity to plonk you down).
Do as many as you can (again at about 2 seconds per movement).
Try not to wobble – keep your hip, knee, and foot in vertical alignment.
Repeat with the other leg.
Results interpretation (per leg)
Fewer than 10: Needs work – use the test as an exercise to strengthen your quad muscles
More than 15: Fair.
More than 20: Good ✅
4. Heel raise test
🚨 Don’t do this if your Achilles tendon is currently injured.
Muscles involved
Calf muscles (gastrocnemius and soleus) – it also strengthens the Achilles tendon.

Instructions - Single-leg calf raise over a step
Stand on one foot on a step with your weight on the front of your foot – the rest of your foot should be jutting out over the side of the step. (Hold on to something for stability – this is not a balance exercise.)
Slowly lift up on your toes.
Lower yourself down so that your heel drops below the level of the step.
Do not stay there – immediately start lifting back up on your toes.
Do as many as you can, using about 3 seconds per up movement and 3 seconds per down movement.
Repeat with the other leg.
Results interpretation (per leg)
It's normal for one leg to be slightly stronger than the other, but ideally the difference shouldn't be more than one or two repetitions.
Fewer than 15 repetitions – needs work
More than 20 – fair
More than 25 – good ✅
💡 If you've had an Achilles injury in the past, doing this exercise with added weight can be useful to maintain good Achilles strength – your physio would have advised you how to fine-tune this for your specific case.
How we can help
Need help with your Achilles or related injury? You’re welcome to consult one of the team at TMA online via video call for an assessment of your injury and a tailored treatment plan.

We're all UK Chartered Physiotherapists with Master’s Degrees related to Sports & Exercise Medicine or at least 10 years' experience in the field. All of us have a wealth of experience working with athletes across a broad variety of sports and ranging from recreationally active people to professional athletes. You can meet the team here.


About the author
Alison Gould is a chartered physiotherapist and holds an MSc in Sports and Exercise Medicine. You can follow her on LinkedIn, Facebook, Instagram, and Twitter.

